Git is an essential tool for software developers, allowing you to manage and track changes in your projects effectively. It is a distributed version control system that helps developers work on projects collaboratively, record project history, and revert to previous states if needed. Whether you are working individually or in a team, Git helps maintain order and ensures that no work gets lost. Let’s dive deeper into the basic Git workflow that will help you streamline your development processes.
What is Git? A Quick Overview
Git is a version control system that allows developers to manage changes in their source code during the development lifecycle. Unlike traditional version control systems, Git is distributed, meaning every developer on the project has a copy of the entire codebase history on their local machine. Git uses commands to manage changes such as git init, git add, git commit, git push, and more, which are part of the Git workflow.
In this article, we’ll cover the following fundamental commands that you will encounter in the Git workflow:
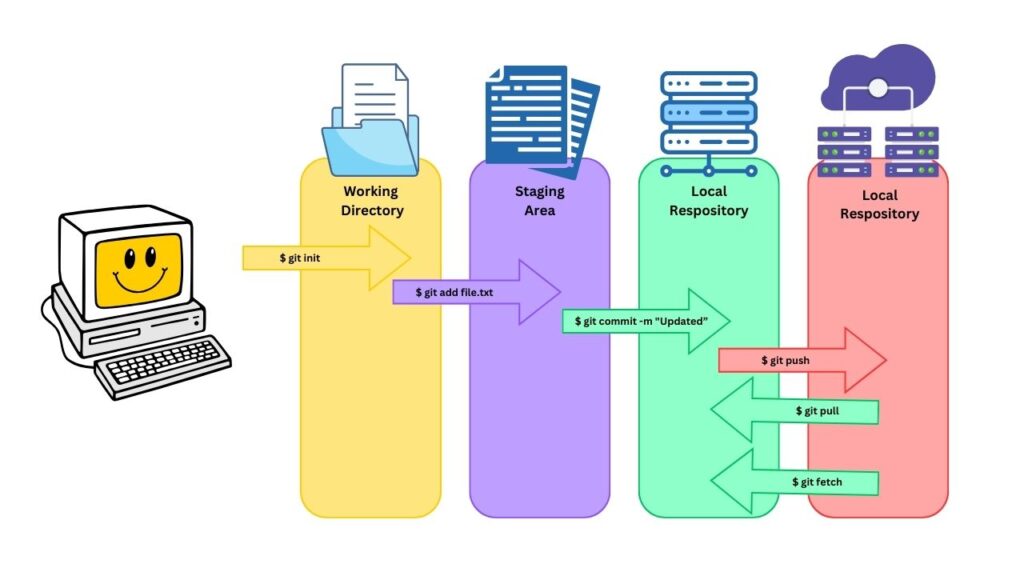
git initgit addgit commitgit pushgit pullgit fetch
1. Initializing a Repository with git init
The first step in using Git is to initialize a repository in your project directory. This is done using the git init command:
bash
Copy code
git init
This command creates a hidden .git folder in the project directory. This folder contains the information that Git needs to start tracking changes in your project. Initializing a repository is like telling Git, “Hey, start tracking changes for this project from now on!”
When you run git init, you create a local Git repository. If you are starting a new project or working on an existing project that is not yet under version control, you must use git init to start managing the project with Git.
2. Adding Changes to the Staging Area with git add
Once your Git repository is initialized, you can start making changes to your files. However, Git doesn’t automatically start tracking all changes—you have to tell it which changes you want to track. This is done using the git add command:
bash
Copy code
git add file.txt
The staging area is where Git prepares files for committing. When you add files to the staging area, you’re marking them as ready to be committed. You can add a single file (git add filename), multiple files (git add file1 file2), or even all changes in the current directory (git add .).
For example, if you modify several files and only want to commit one of those files, you need to add it explicitly using git add.
3. Committing Changes with git commit
Once you’ve added files to the staging area, the next step is to commit them. Committing creates a new snapshot of the project’s current state. The git commit command is used as follows:
bash
Copy code
git commit -m "Updated the README file"
The -m flag is used to add a descriptive message to your commit, which helps you remember the purpose of the changes. These commit messages are crucial for maintaining a clear project history. Each commit represents a point in your project’s history that you can easily go back to if needed.
The local repository now contains a record of your changes. Unlike saving a file on your computer, commits are versioned, meaning that Git stores the changes along with metadata such as the timestamp, commit author, and message.
4. Pushing Changes to a Remote Repository with git push
After committing the changes to your local repository, you will often need to share them with others. This is done by pushing the changes to a remote repository, such as GitHub or GitLab, using the git push command:
bash
Copy code
git push origin main
In this command, origin refers to the default name of the remote repository, and main refers to the branch you want to push to. Pushing sends your committed changes from the local repository to the remote repository, allowing others to see and access your work.
Pushing is essential for collaborating on projects. It helps to keep the remote repository up-to-date so that all collaborators can access the latest changes.
5. Updating Your Local Repository with git pull
In a collaborative environment, multiple developers make changes to the same project. To ensure that your local repository is in sync with the remote repository, you use the git pull command:
bash
Copy code
git pull origin main
The git pull command fetches changes from the remote repository and merges them into your local branch. It keeps your local working copy up-to-date with the latest changes from other team members.
The pull command is a combination of two actions: git fetch and git merge. This means that it first downloads any changes from the remote repository and then merges them with your local branch. Pulling regularly ensures that you avoid merge conflicts and stay aligned with other contributors’ changes.
6. Fetching Updates from the Remote Repository with git fetch
Sometimes, you may want to see what changes are available in the remote repository before merging them into your local repository. This is where git fetch comes in handy:
bash
Copy code
git fetch origin
git fetch downloads changes from the remote repository but doesn’t merge them automatically. It updates your remote tracking branches, allowing you to see which branches have new commits without modifying your local branch.
For instance, if you want to inspect the latest changes before applying them, you can use git fetch and then decide whether you want to merge the changes. This command is particularly useful for evaluating the work of other developers and ensuring everything is in order before proceeding with the integration.
Understanding Branches in Git
Branches are an important concept in Git. A branch is like a separate line of development. It allows developers to work on new features or bug fixes in isolation, without affecting the main codebase. By default, Git creates a branch named main, but you can create as many branches as needed:
bash
Copy code
git branch feature-branch
After creating a branch, you can switch to it using the git checkout command:
bash
Copy code
git checkout feature-branch
This workflow is particularly useful when developing new features, as it keeps the code isolated until it is stable enough to merge with the main branch.
Merging Branches
After completing the work on a branch, you might want to merge it back into the main branch. To merge a branch into your current branch, use the git merge command:
bash
Copy code
git checkout main git merge feature-branch
Merging helps bring changes from different branches together. This is usually done when a new feature or bug fix is complete and ready to be integrated with the main codebase.
Resolving Merge Conflicts
Merge conflicts occur when Git cannot automatically reconcile differences between branches. This often happens when two branches have made conflicting changes to the same line of code. In such cases, Git will prompt you to resolve the conflict manually.
To resolve a merge conflict, open the affected file and decide which changes to keep. After editing the file to resolve the conflicts, you add the file to the staging area and commit the changes:
bash
Copy code
git add conflicted-file.txt git commit -m "Resolved merge conflict"
Handling merge conflicts is an essential skill for any developer, as it ensures the integrity of the project.
Read About: A Comprehensive Git Commands Cheat Sheet for Efficient Version Control.
Conclusion: Mastering the Git Workflow
Git is an incredibly powerful tool that plays a crucial role in modern software development. Understanding the basic Git workflow is key to managing your projects effectively, whether you are working alone or collaborating with a team. The fundamental Git commands—git init, git add, git commit, git push, git pull, and git fetch—form the foundation of version control and help keep your code organized, safe, and accessible.
By understanding and applying these commands, you can contribute more effectively to collaborative projects, manage changes in your code, and ensure that your work remains stable and versioned. Mastering Git means more than just using commands—it’s about understanding when and why to use them to create an efficient and smooth development process.
Keep practicing the Git workflow until it becomes second nature. With a solid understanding of Git, you will have the tools necessary to succeed in any development project, maintain a clean project history, and work smoothly with other developers.